
Wednesday, September 2, 2015
Tuesday, September 1, 2015
Creating an Extra Credit Column in the Grade Center
First, she will set up an Extra Credit category and then an Extra Credit column. Then she will include the new column in the Grade Center's Total column. Here's how:
- Go to Grade Center
- Mouse over the menu for Manage and choose Categories.

- On the Categories screen, click Create Category

- On the Create Categories screen, enter "Extra Credit" in the Name text box.

- Click Submit.
- On the main grade center screen, click Create Column.

- On the Create Grade Column screen, enter a name such as "Extra Credit." You might add a note in the Description box how many extra credit points are available.

- Select Score for Primary Display. An additional option may be select from Secondary Display but this is optional and students will not see it.
- Select Extra Credit from the Category drop down box.
- Enter the score 0 in the blank field for Points Possible.

- In the Options section, select Yes for Include this Column in Grade Center calculations.
- Select Yes for Show this column to Students.
- Select No for Show Statistics (average and median) for this column to Students in My Grades.

- Click Submit.
10 extra credit points have been entered in the Extra Credit column. Notice the Total has automatically changed.

Organizing the Grade Center
Blackboard's Grade Center can freeze grade columns, re-order grade columns
using drag-and-drop, quickly hide or display grade columns, and
much more using the Column Organization page.

On the Column Organization page, look for the four headed arrows in the far left column. To drag an item, place the cursor over one of the arrows. The cursor will change to a four headed arrow.

While pointing to the arrow, hold down the mouse button and drag the item to a new position in the list.

To freeze a column:

When finished, click Submit.
Keep in mind that the instructions given below only affect the instructor's view of the Grade Center, not the student's view


Drag and Drop Grade Columns
- Go to the Grade Center.
- Click the Manage button and select Column Organization from the menu.
On the Column Organization page, look for the four headed arrows in the far left column. To drag an item, place the cursor over one of the arrows. The cursor will change to a four headed arrow.
While pointing to the arrow, hold down the mouse button and drag the item to a new position in the list.
- Release the mouse button when the item reaches the position where it should be dropped.
- When finished, click Submit.
Freeze Grade Columns
Grade Center columns can be frozen in place so they do not move while scrolling through the other data. Frozen columns remain in place on the left side of the Grade Center while the rest of the columns can be scrolled across. This helps instructors easily match up individual students with their scores across the length of the Grade Center. Instructors can freeze and unfreeze any of the columns in the Grade Center page.To freeze a column:
- Go to the Grade Center.
- Click Manage and select Column Organization from the menu.
- On theColumn Organization page, notice the dark gray bar. Everything above the bar is frozen.
- To add a grade column to the "frozen" section, click the four-sided arrow next to the item name and click-and-drag the row above the dark gray bar.
When finished, click Submit.
Hide Grade Columns
If a Grade Center has a lot of columns, it is sometimes easier to enter grades if some columns are temporarily hidden. Also, you may want to hide grading columns that appear in Blackboard by default that you will never use (such as Student ID or Username).Keep in mind that the instructions given below only affect the instructor's view of the Grade Center, not the student's view
- Go to the Grade Center.
- Click Manage and select Column Organization from the menu.
- On the Column Organization page, decide what item(s) should be hidden. Place a check mark in each check box that you would like to hide.
- Scroll to the top of the page and select the menu for Show/Hide. Click Hide Selected Columns from the menu.
- The page will immediately update. The selected column names turn gray and the word "(Hidden)" appears in the list next to the column name.
- Click Submit when finished.
- On the main Grade Center page, the selected columns no longer display.
Because the columns are only "hidden," they can be displayed again.
To "show" items, return to the Column Organization pagee and place a check mark in each check box for each hidden item that should be displayed. Scroll to the top of the page and select the menu for Show/Hide. Click Show Selected Columns from the menu.
To "show" items, return to the Column Organization pagee and place a check mark in each check box for each hidden item that should be displayed. Scroll to the top of the page and select the menu for Show/Hide. Click Show Selected Columns from the menu.
Tuesday, August 25, 2015
Clearing a Browser's Cache May Help Fix a Lot of Blackboard Issues
Firefox for Windows
- If the "History" menu does not appear at the top, press the "ALT" key on your keyboard.
- From the History (or the "Tools") menu, select "Clear Recent History".
- From the "Time Range to clear" drop-down, choose "Everything"
- Under "Details" check all the boxes. Click "Clear Now"

Google Chrome
- Open Google Chrome and click the Chrome menu (
 ) upper-right.
 - Click Settings.
- Click "Show Advanced Settings..."
- Click the "Clear browsing data..." button.
- Select "the beginning of time" from the drop-down
- Check the following boxes, and click "Clear browsing data":

Firefox for Macintosh
- From the Firefox menu, select History...
- From the sheet that drops down, select Clear Recent History. Select Everything from the "Time Range to Clear" drop down menu. Select the check boxes for "Browsing & Download History", "Forms & Search History", "Cookies", "Cache" then Select "Clear Now".
Safari for Macintosh
- From the Safari menu, select Reset Safari...
- When prompted, click Reset to confirm that you want to reset the browser.
Instructions for taking exams in Lockdown Browser:
- Click on the LockDown Browser icon on your computer’s desktop or locate within your computer’s program list.
- If prompted to close a blocked program (Instant Messenger, Skype, etc.), choose Yes or Kill These Applications.
- The Blackboard login screen will appear. Login to your course.
- Enter your course, click on the name of the test and click the Begin button.
- A new window will pop open asking whether the instructor has required a password for the test. If the instructor has provided a password, select Yes and enter the password and then click Continue to begin the exam.
- If the instructor did not provide a password, select No and click Continue. Respondus LockDown Browser will automatically fill in a special password on the next screen. This password should not be modified.
- Submit your answers and then click the Submit button when finished to complete your test.
Respondus Lockdown Browser Exam
Some instructors may require students to take tests using Respondus
Lockdown Browser, which is a special browser intended only for taking
tests. In order to take tests that require Respondus Lockdown Browser,
students must first download the program and install it on their
computers. Then students will need to launch Lockdown Browser in order
to take exams that require it. Exams that require Lockdown Browser
cannot be launched in a regular browser. The Lockdown browser can be
downloaded from software.sacredheart.edu.
If you need help installing Respondus Lockdown Browser visit the Factory and they would be happy to assist you.
Help! My Weighted Total is Incorrect!
It’s a common problem caused by that tiny Devil who resides in the
details. Very often, the cause is this: a discrepancy between a column’s
possible points and those actually entered. In other words, when you
first set up grading on a tool (or on a manually-made column), you might
have assigned the highest possible points as something different than
what you actually graded for. An example would be, I have entered 30 as
possible points on a final paper, but forgetting this weeks later,
I used a base of 100 when grading.
This is easy to check by hovering over the top of the column and checking the information that appears just at the top of the grade center area. See figure here:
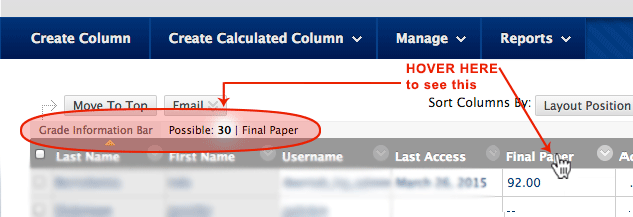
To fix it, hover and click the small arrow at the top of the erroneous column, choose “Edit Column Information” and change the points possible to 100 (or whatever scale you used for grading).
This is easy to check by hovering over the top of the column and checking the information that appears just at the top of the grade center area. See figure here:
To fix it, hover and click the small arrow at the top of the erroneous column, choose “Edit Column Information” and change the points possible to 100 (or whatever scale you used for grading).
Subscribe to:
Posts (Atom)